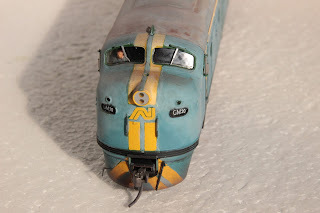
Well all the planets aligned, I got a weekend off, and the weather was good enough to start spray painting.
So here is a bit of detail on how I turned a plastic fantastic GM16 into a functioning looking faded and battle scared GM20 metal.
Here is the final product minus the air horns.
Firstly if you are going to attempt something like this, I highly recommend you get photos of your intended prototype, stuff like this can't be done from memory.
Second don't be scared, the secret is to really analyse the colours you are after.
Here are some shots of the prototype.
Yes GM20 has had a hard life and the livery on the side has turned more white to aqua, note the colour of the yellow stripe vs the nose stripes.
Other items of note,
The rust showing through on the cab roof and on the nose.
the B end seems to be less faded than the A end.
The paint is also leaching out in certain areas, and as created streaks.
To get this effect you will need to use multiple washes, to get the effect you are after.
The first thing you need to do is pick the lightest colour of the body paint.
Mix this colour, and cover the green areas of the locomotive, so that you have a "light" base from which you can bleed in with heavier colours later.
here is the first coat, as you can see, right now this is where most people would be taken back in shock.
but don't worry this is just the base colour.
This is a mix of Humbrol 2, 47, 34 and 25.
I let this colour dry for a day or two to ensure that it would not bleed away with repeat washes over the top.
Here is the mixing palette, the base colour is in the bottom left hand corner.
After another wash of a more Aqua colour things are looking more normal.
Still it does highlight the roof colour as "oh so dark"
The wash was again done with humbrol paints, various washes with a brush, again leave to dry for at least a day between washes.
After three washes of Aqua in varying hues, one wash of AN Humbrol 101 green to selected places and one wash of black to bring out all the detail, across rivets etc, its starting to look the part.
The roof has been given a wash of Humbrol 64.
Then once dry, I mixed up a colour of surface rust, and gently applied this in key areas as per the prototype.
A wash of Humbrol 69 yellow and 34 white toned down the side stripes to match the prototype fade.
The bogies were painted humbrol 33 black.
At this point, all the weathering you see has been done with a selection of various sizes of brushes and gentle washes.
note: before you do any spray painting, remove the cab glass.
Note the rust marks showing through as per the prototype on the roof and nose.
The B end has a wash of yellow and white, with a follow up wash of rust.
The secret here is to be random, and not consistent in the paint thickness.
The final application:
To blend all these colours in together, a spray of road grime and rust was lightly sprayed on the roof, body sides and bottom of the bogies.
A spray of sand on the bogies and fuel tank.
Flat black on the exhaust area.
The whole locomotive was then sprayed, matt clear.
The difference between fantastic plastic GM1 and GM20 is well illustrated here. The change is quite obvious.
Well GM20 is now looks the part, happy leading the Ghan, or shunting around Alice Springs.
I hope this short article, inspires you to give this version of weathering a go.
Enjoy
Scott


Fizzo
ReplyDeleteGM 20 Looks fantastic, particularly when compared to the prototype pics. Look fwd to seeing it in the flesh.
Doug
Hi Scott
ReplyDeleteHolly cow, i can't get over the weathering on GM 20 i'm giving serious thought to buying another green GM just to have one like that in my own fleet, because i wanted a cleanish pair but that is great, well done
Michael